
Wednesday, December 15, 2010
Bathroom tiles
Friday, November 19, 2010
Staircase I: Bringing in the pieces
 We decided to go ahead with installing the staircase over the winter. This comes from the same stock of ash we used for the kitchen counters. Will sawed up the raw ash boards in is workshop and laminated them into a landing for the staircase. This is actually the back of the landing, and will be hidden from view. The face-up side will have fewer darker whorls in it (although I like the whorls; it givees the hardwood character). It looks like he laminated about 8 1-inch boards before planing, sanding, and applying 4 coats of polyurethane finish.
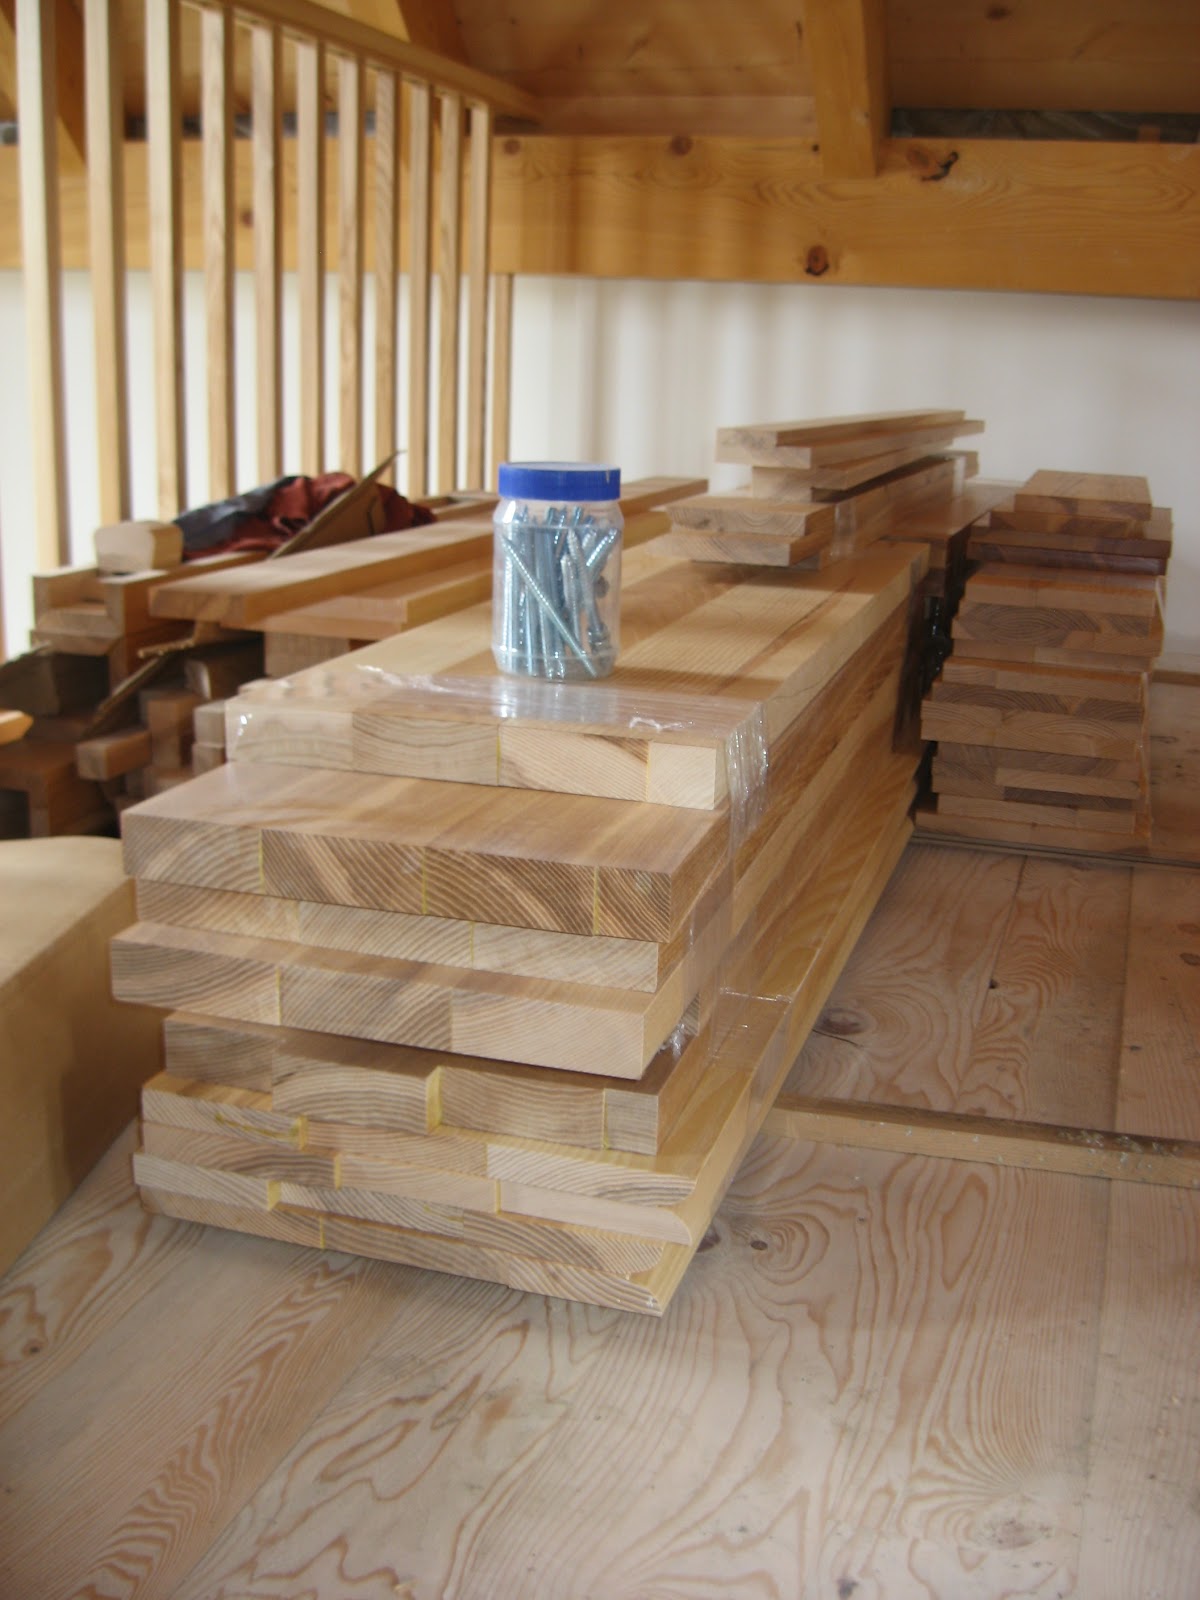
The image at right shows the actual treads and risers for the stairs. I believe these are made of the 1 1/2" planks. To the left you see the railings Will installed to keep people from flying off the second floor into the living room. These are also made of the same ash (there seems to be a theme here). I believe some of these pieces will also be used as baseboards and false runners to for the staircase. I like the two tone grain. It was an old, huge tree and we got it just before it started rotting. I believe the tree was about 80 years old, which is about the lifespan of ash. They are a fast growing but short-lived tree.
Wednesday, November 17, 2010
Autumn cloud

Sunday, October 17, 2010
Choosing colours
 We are very happy with how the door colours worked out. Willy actually stained them with two coats of Muskoka red. It actually looks better here, a little darker than anticipated, but I think it actually looks better than the preview. The lighting probably helps.
It's pretty much the only splash of colour on a very neutral house, so it doesn't overwhelm the eye as you might expect red to do.

 Choosing Door Colours
So red it is for the doors, but which red?
After deliberating with Willy, we decided to go with a stain instead of paint. Paint chips, especially on doors; stain does not.
 Stain also lets more of the grain of the wood get through and protects the wood.
Fortunately, a company called Sansin offers a fine alternative of saturated colors in stain (see link below). They offer three shades of red, and I had to see how they looked so I simulated them on some image editing software. They are in order of appearance:
- Primary red
- Heritage red
- Muskoka red
Link: Sansin saturated colors
Hydronic heating partially installed

 The hydronic heating system is partially installed. Seen here is the utility closet. The first picture gives the view from the living room (a door will eventually block this view, although the plumber and I agreed that this beautiful work of copper and heating technology should be displayed; Lisa seems to think utilities should be hidden by silly doors; what an artsy!). The second image shows the view looking around the corner in the closet to the right towards the hot water tank.
I've already pretty much outlined everything this does, so if you are technically inclined, I refer you to the link to the solar hydronic heating system at the right side of the blog to read up on this.
Roof and chimney flashing
 The roof is finally covered. We actually got it done end of September, but I haven't had time to update. It's good to get it done, though, especially with these torrential rains we've been having. It was one of those things that kept me up nights. The unfinished roof was actually covered by a black, water-proof membrane that held through the winter and summer, but there is nothing like the security of 26 gauge metal over your head.
 Lisa and I were originally horrified by the flashing around the bottom of the chimney. Then we looked around at some roofs with brick chimneys. Flashing is just not pretty. You just don't notice it until you really look.
The flashing is important. It keeps the water from infiltrating in the crack between the chimney and the roof metal. We have a leaky roof now in the old place. Not fun. We'll keep the flashing as is.
Kitchen window sill
 A nice thing about timber frames over conventional houses is that the walls are made of light trusses and can be made thick. A side benefit of this is deep window sills. Lisa made an executive decision to have Willy finish the kitchen windows with the same ash as our kitchen counter tops so that we can treat it as an extension of the counter. It was kind of hard to capture this because of the glare you get off the finished wood near windows, but these pictures illustrate the effect.
 The window remains unfinished for now, but eventually (i.e. when we have money again) we'll have the ash lining the entire window. Lisa is putting on a urethane finish on all the windows to protect them from mold and condensation in the wintertime. I wish I could say it was worth the effort, but I can't because it's all Lisa's effort; we have occasionally discussed the advantages of PVC when faced with the work necessary for maintaining wood windows.
This will be the only window finished for the winter. We thought we'd leave it all until the spring, but Lisa figures she likes her time in the kitchen and that it will be all the more pleasant with a finished window supplying that extra counter space.
.
The window remains unfinished for now, but eventually (i.e. when we have money again) we'll have the ash lining the entire window. Lisa is putting on a urethane finish on all the windows to protect them from mold and condensation in the wintertime. I wish I could say it was worth the effort, but I can't because it's all Lisa's effort; we have occasionally discussed the advantages of PVC when faced with the work necessary for maintaining wood windows.
This will be the only window finished for the winter. We thought we'd leave it all until the spring, but Lisa figures she likes her time in the kitchen and that it will be all the more pleasant with a finished window supplying that extra counter space.
.
South-side door
 The south-side door actually looks a lot like the east-side door, but it is framed by the porch. It still works as that splash o' colour on the natural neutral tones of the wood.
The little step is a temporary measure made of hemlock by Joey because he was sick of using blocks (stacked on the left in the photo) as steps. Oh yeah, the insurance required it as well. I kind of like the steps. With a more suitable footing, we can probably keep them for a while. The stacked blocks are actually off cuts from Willy's timbers, and the carpenters use them to keep the good lumber off the ground.
I'm kind of looking forward to the metal going on the porch roof. Once the solar collectors are installed, that should get done quickly. You want to step on the metal as little possible.
 Here's a picture of the hardwood threshold that came as part of the doorframe. It's protected by the porch and made of ash, so it should now be quite durable. Hardwood is susceptible to weathering, so Lisa put 5 coats of urethane on it last week. I guess you can say Lisa gave our ash a good shellacking :-).
East side door
 Here's a great picture of the east-side door. I like it because you can see the view from the east side of the house in the window reflection better than if you take an actual picture of the view. It adds a little tone of blue to the red of the door and the warm yellow of the hemlock siding. It gives a good idea of the different elements of the door: the white trim, the red door, and if you look carefully, the ash threshold. Behind the windows, you can see a little bit of the scafolding that Lisa will be using to urethane the upper window interiors. The green borders around the window interiors are is tape that protects the windows from the urethane.
 I like the detail in the second picture because it shows how the knots of the pine doors still come through the red stain. That wouldn't happen as readily with paint.
 Lisa just accused me of navel-gazing for my heartfelt, earnest appreciation of these photos. Hmph!
Saturday, October 16, 2010
Copper pipe insulation
 One odd thing about the heating trade is that they don't really want to sell the the products they manufacture. I've been going crazy trying to hunt down some heavy insulation for my solar pipes. The regular stuff you buy in stores melts when facing the high temperatures.
Armaflex
I've managed to hunt down some Armaflex insulation at the Home Depot in Burlington, Vermont. It's usually used in refrigeration systems to ward off condensation, but it works well in high-temperature solar applications.
- Price: $6
- Max temperature: 220 F or 105 C
- Min temperature: -257 F or -183 C
- Lengths: 6 ft
- Diameter: 1.875" (about 1/2'' thickness)
- Pipe diameter 3/4"
Monday, September 20, 2010
East side progress
 Well, it's beyond progress now ... it's done!
It's all done but the south side and the porch. We delivered the last load of siding to the site today, and the boys finished off the south side. The electrician was in today too and was finishing a good amount of switches and sockets (to be shown tomorrow).
 9/14/10
It was relatively dry today so the carpenters got to work on east-side siding. Wouldn't the door look good in red?
It's good to see this with the siding on. That unfinished look is getting old real quick. It's encouraging to see that it looks better than we imagined.
Tuesday, September 14, 2010
Framed staircase
 We went with Plan A on the stairs, which was to enclose the area beneath them for closet and storage. The option was open risers, but those usually need a bigger space to look good. This was the right decision.
Will will soon but in ash railings and steps in. These will make the stairs better than the current temporary carpenters stairs.
Completed upstairs floor
 Here's a picture of the completed upstairs landing. The edge trim of the floor was added this week on a rainy day. Nice job on the corners. I'm glad we have carpenters that like making it look nice.
The sink bothers me. We put it too far to the left. It kills me that I can look at that gorgeous ash counter top and only see the sink. There's just too much stuff to do on a house to think of everything and get it all right.
Doors
 Well, the trash clutters up the view a bit, but here's the door trimmed with the white Maibec and with a temporary step leading up to the porch. It will look better once the siding is on. Still haven't decided on a permanent solution for the stairs, which will get dripped on by runoff from the roof.
One thing for sure now that I see it is that we will go with a red door. paint is not appropriate as it will chip, so we'll have to get a nice bright red stain for the door. That will add a splash of color on some rather neutral colors.
Friday, September 10, 2010
West side story
 Well, the saga of the west wall has nearly come to an end. The siding is all done, and damn it looks good. I love wood.
The only thing left on this side is the fascia along the gables of the roof, and maybe some white trim on the fascia of the porch.
 It also helps to see the sun after several days of drizzle. The blue sky looks extra good against this cream coloured wooden siding (soon to be gray).
Still have the front sides of the house to cover. There are more windows here, so they could be a while. The siding goes up quick. It's the trim around the windows that needs careful sealing to prevent water infiltration.
Sunday, September 5, 2010
Project evolution: before, during, and after
Saturday, Sept 4, 2010
 Thursday, June 23, 2010
 Thursday, June 2, 2010
Wednesday, March 17, 2010 Wednesday, March 3, 2010
 Friday, January 22, 2010
 Erected frame: Dec. 18, 2009
 Insulated foundation: Nov. 10, 2009
 Foundation done before backfill: Oct. 25, 2009
  We're on the rock. About 1-2 ft of soil, clay, and sand was removed. Seems the site is a little flatter than anticipated.
During excavation: Oct. 1, 2009 Before excavation: Sept. 10, 2009

 Thursday, June 23, 2010
 Thursday, June 2, 2010
Wednesday, March 17, 2010
 Wednesday, March 3, 2010
 Friday, January 22, 2010
 Erected frame: Dec. 18, 2009
 Insulated foundation: Nov. 10, 2009
 Foundation done before backfill: Oct. 25, 2009
  We're on the rock. About 1-2 ft of soil, clay, and sand was removed. Seems the site is a little flatter than anticipated.
During excavation: Oct. 1, 2009
 Before excavation: Sept. 10, 2009
Window trim detail
 This is the north-side bedroom window. All the windows will look like this when we're done (well, maybe the photographer won't be reflected in the panes all the time). The Maibec ultra-white trim is 4'' wide and 1 1/4'' thick, matching the white cladding on the windows. If you look carefully you'll see that the trim on top is covered with a little "roof". At this close range you can actually see the candle distort the perspective slightly.
The picture below shows the detail of the bottom right corner. You can see the white painted nails in the trim and the stainless steel nails in the hemlock siding. You can also see the paint seal used between the horizontal trim below the window and the vertical trim to the right of the window.
 Also visible is the white caulking used to seal the window and trim.
Corner moulding trim details
 Here's a picture showing the moulding details on the corner trim and siding. The white mouldings were first nailed down using zinc galvinized nails from Maibec painted and textured to match the siding. The natural hemlock siding is nailed down using stainless steel nails to make sure they do not leave ugly rust streaks on the wood siding in a few years time. We chose a clear (as opposed to white) seal to close the gab between the two. Hemlock does not shrink lengthwise as much as other wood, so hopefully this gap will stay closed.
I think Alex, Gord, and Joey really enjoy this part of the job. They are paying extra attention to detail. It's worth the extra time they take to seal up the joints nicely. It assures we won't have to do this again in 5 or 10 years time (knock wood!).
Soffits
 What's a soffit anyways? A soffit is a decorative piece of wood, aluminum, or PVC that covers the underside of a roof overhang. It keeps critters and water from infiltrating the underside of your roof. It needs to include vents because you want air to be able to circulate between your roof covering and your insulation to prevent condensation and to prevent nasty ice dams from forming along the edge of your roof when temperatures start dipping below freezing. Unless the underside of your roof covering is vented, heat from the house will melt snow on the upper reaches of your roof. This will then freeze when it trickles down to the overhang, causing the water to pool and the roof to leak.
So here are the vented soffits on the edge of the kitchen. We used leftover boards from the ceiling. We had plenty leftover because the supplier of the planks sent about 20% more than ordered; dried hemlock usually splinters quite a bit. We've been handling it carefully, so we had maybe only 5% waste. The carpenters brought in strips of white coated aluminum for the vents. They will look much better when the fascias (roof edges) are also covered in white Maibec.
Time to put on the soffits!
 Here's Lisa checking out what was a humongous hornets nest growing under the gables of the south side of the house. Apparantly, the wasps and hornets like our house almost as much as we do. Gordie and Joey knocked down part of the nest with a long piece of Maibec, and Alex proceeded to finish it off with a can of raid. The warm weather we've been having probably helped to keep the nest growing.
  There are still a few angry looking hornets swarming around up there. Hopefully the cooler weather will keep the nest from growing again.
Several creatures have alrady visited the home. Early in the spring, chickadees would fly in the open doorways and not be able to find their way out again. Phoebe's made a nest in a few cornices, and the cat already hunted down a few mice that may their way in through open doorways. I think I heard a few squirrels scratching around in the roof above the kitchen too. Hopefully, having the doors installed and sealing up the soffits will prevent these visits in the future.
Foundation covering
 I know this picture isn't pretty, but this part of the job has been put off and has kept me up nights, so it's a big deal to see it getting done. We covered the exposed part of the foundation insulation with about 1 foot of coated white aluminum flashing. Note that it is folded over the bottom of the wall furring to prevent vermin from crawling in the walls between the siding (not shown), sheathing (white), and furring strips (wooden). Gord has a special tool for bending metal like this.
 The blue foundation insulation is already discolored from the morning sun beating down on it all summer. It was about time we covered it up. Hopefully, it didn't lose too much of its insulation value. This is on the east side of the house. The corner trim actually helps to hold it in place for now, and it will eventually be covered by siding. Alex was worried that the white flashing would look too white and get too dirty looking once it's been on for a while. As it turns out, it actually takes on a little bit of a grayish tinge when contrasted with the ultra-white of the Maibec trim, so it doesn't look too bad.
Saturday, September 4, 2010
Trim and mouldings
 Despite having enough hemlock boards for trim, we decided to go with Maibec for the corner boards, window trim, and fascias. The reason is that we wanted a little colour in the hose to accent the natural wood of the rabbeted bevel siding, especially when it starts turning grey. Maibec is wood coated with several layers of factory-coated paint with the paint lasting about 20 years (we don't want to paint it every two years). We
 chose ultra-white because it matches the cladding on the windows and because it makes for a nice bright contrast to the natural wood siding (and with the grey once the siding is weathered). The guys managed to finish the bottom half of the west side of the house and are getting the scaffolding up again to finish the upper part of the house.
Here's a picture of an outside corner with the west side finished with siding and the south side unfinished. The corner is constructed using two 2'' boards painted on all sides. It is nailed to the furring lats and over white aluminum flashing that covers the blue insulation on the foundation. We should have covered the foundation insulation before back-filling it. Styrofoam is resistant to just about everything except UV radiation from the sun.
Thursday, September 2, 2010
More siding
 Darn, this looks good.
I think I might put a sealant on the bottom two planks to keep them from turning grey prematurely.
Wednesday, September 1, 2010
Up goes the siding
 Here's the siding going up on the North side of the house outside the bedroom window. Wow does it look good. This is the siding we had sawn from logs out of the woods. Also shown is the window and corner trim from Maibec (white). Maibec is wood treated with paint that's supposed to last 20 years. The effect of the white trim will be to offset the hemlock siding (which we will let go grey like an old barn). The hemlock tends to crack, but there doesn't seem to be more than 10% wasted for now.
Also shown is the white flashing covering the foundation insulation. Hold have put this on a long time ago. Better late than never.
Thursday, August 19, 2010
Finished painting
 Here's a look at the upstairs following the drywall, mudding, and painting. It pretty much sums up all the nice work and contributions: the timber frame from Willy Lemaitre from Sutton, Alex Courvoisier (from Dunham) assembly job, the ceiling planks from Nicholas Hamel in the Beauce, the windows from Elite courtesy of the Liptak family near Ottawa, the flooring planks sawn up by Martial Marois in Granby, and finally the mudding and painting by Luc Tremblay in Frelighsburg to bring out the colours in grains in all this wood.
With the afternoon sun provided by mother natures, it makes for a really nice picture from the staircase.
Subscribe to:
Comments (Atom)