Tuesday, June 1, 2010

Entrance porch: Deck

Yesterday, we started the back porch. The deck extends out 50'' (4'8'') from the foundation insulation and roughly 32' along the entire south side of the house. Lisa and I moved the lesser quality 2x6 and 2x8 hemlock planks we had sawed last spring from the woods to the work site (the good ones will be used for siding and the upstairs flooring. The crew (that's Gord near the pickup) cut them up and assembled the deck frame. We thought we might plane and sand the floor planks (1.5' x 6''), but decided that we'd sand the floor once the project is finished (doesn't make sense to make them all nice while work crews are coming and going).

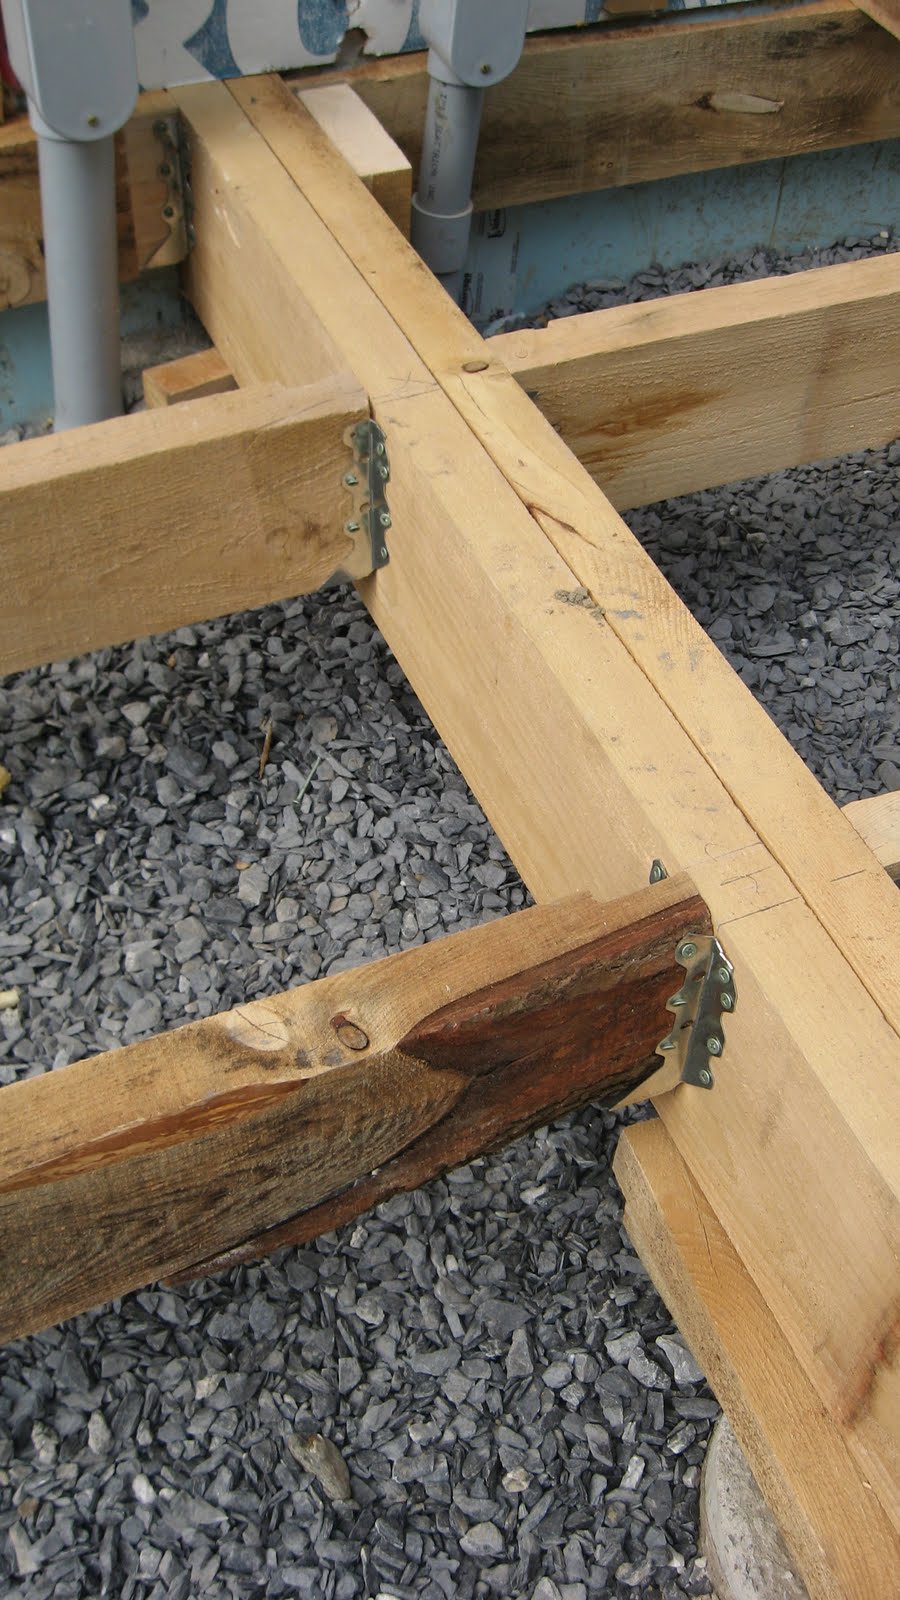
Besides, this is a working country porch overlooking a gravel driveway, a maple wood, and a small pond, not a prefabricated deck to line a backyard pool from Club Piscine.

The frame is suspended on concrete pillars that we poured from pre-mixed concrete into cardboard cylinders called "sonotubes". Normally, these extend down 4 feet below the frost line, but in our case they extend down to the bedrock. We will need to put a polyethylene (plastic) as a barrier between the concrete and wood. Concrete is quite corrosive to wood, even eastern hemlock, which is more resistant to rot and the elements than most other species (cedar).

This picture shows some details of the deck framing. The double beams are made of 2x8 . They span the pillars, and will support the posts that hold up the porch roof. They also support the floor joists, which still have the bark from the trees on them.

Monday, May 31, 2010

Chimney for woodstove

The chimney for the woodstove was installed March 4 and 5. We chose brick because we don't like modern prefabricated flues. Brick is much more decorative, both on the inside and the outside. Here you can see the round flue at top as the masons build the chimney upward. Note the cast iron cleaning door at the lower left side of the chimney and the plumb lines defining the corners of the brick casing.

Here I am scowling at the end of the day. I made the mistake of ordering the entry into the flue too high because I had to rush off to work in the morning. The code for the woodstove requires a two foot clearance from the nearest structural beam. The mason, Mario Granger, was kind enough to lower it the following day in half an hour. . He did a very good job and you wouldn't know that he dismantled and reassembled the brick unless you were looking very, very closely.

Lisa says I seriously need to unclench about this project.

Saturday, May 29, 2010

Windows installed

Here are some spring time views of the progress. My father took these pictures in early April, circumambulating the house. The first picture shows the front of the house as it appears coming up the driveway. The front windows are completely installed.

The second picture shows the main entrance on the side of the house.

The third shows the view at the back of the house.


Monday, March 22, 2010

Bath/Utility

New Plan for bath and utility.

Based on
  • existing dimensions of washer drier
  • contender hot water tank

Monday, March 15, 2010

Plan for heated slab


It's almost time to pour the heated slab. Here's a footprint of the preparations for the slab. A previous post gives a nice overview of the foundation footprint.

Features include:
  • A 4' perimeter of 2'' Styrofoam SM around the outside walls (light blue)
  • A pantry area and storage area under the stairs which is to be unheated (dark blue)
  • Manifold box (dark red)
Installation will include
  • Compacted 1/2'' clear stone to fill the foundation
  • 6 mm or thicker polyethylene vapor barrier
  • 2'' Styrofoam SM
  • Rebar grid to reinforce concrete and hold tubing in place
  • 3 closed loop Pex tubing tied to rebar with plastic ties and attached to slab manifold
  • 4'' poured concrete slab
References

Saturday, March 13, 2010

East side of house enclosed

We had a wintertime lull in the construction (including an overnight 2-foot dump of snow that left us shoveling out the house site) so I've been a little despondent about progress lately. But things are on track again after two beautiful weeks of sunshine and maple-sap-producing temperatures (above freezing during day, below freezing at night). We've had steady progress with carpenters on the site 5 days a week, plus 2 days with the mason installing the brick chimney (next post). The lack of rain has meant a relatively dry site during the early thaw, with dry roads that let trucks and trailers make it up Pinnacle Road without carving huge ruts in what's usually a very muddy road.

Note that the carpenters took advantage of the scaffolding on the east side and installed the windows in the cathedral part of the house. These are fixed windows that cannot really be accessed otherwise. It's very tempting to get the porch on right away, but other projects await.


Monday, March 1, 2010

Revised wall system

The builder made a few alterations to the wall system on site. In particular, the sill system has been altered. Flooring and base boards are new to the design as well. The extra insulation needed for the foundation needed for the heated floor slab complicate the design a little. Obviously, styrofoam is not going to support the wall trusses.

On the other hand, the wall trusses are supported by the timber frame. It's still nice to have part of the wall trusses over the concrete foundation. The southern wall will feature a 4'9'' wide awning to allow full sun on the windows in the winter but little or no sun in the summer. To support the awning, 2'' x 8'' wall studs will be added in line with the trusses.

The photo shows a cross section of the wall system, including the sill board. The shiplapped siding will come down over the foundation insulation and will be sealed at the bottom (seal not shown) to prevent moisture infiltration.