
Francois did a nice job, filling in the knots and some of the gaps that opened in the joints (it's what hemlock does).
 Here's a look at the finished railings with the finished staircase and the finished floors. The railings, stairs and window trims are ash that was cut in the woods (click here!). and finished and installed by Willy the timberframer. Good view in this picture of how it all works together. The yellowishness of the hemlock timbers and ceiling planks matches the lighter birch floor planks, the knots in the timbers go with the knots in the floor planks, and the bright hues of the ash are brought in the brighter floorboards. The floor brings it all together.
  I sound like an art critic.
 Yellow birch (as the name implies) has a nice yellowish hue that matches the Hermlock timbers. It's also cheaper than the other hardwood species.
 It looks like the staircase is going to be one of those things in the house that will come out more beautiful than we ever imagined. Here's a detailed view of the landing. The false stringers along the back wall meet with the baseboard of the landing at a 45 degree angle. Willy had actually intended for the stringer to move down to the landing, but cut it too short and had to improvise the joint. It actually looks better than the original plan. You can see the profile of the baseboards with the pieces leaning against the wall at right.
  The second image shows a view similar to the one given in the previous posting, but with a better view of the false stringers (along the side of the upper staircase) and of the the upstairs windows. After looking at the unfinished staircase for months, it's good to see the finished product taking shape.

 I thought I'd posted these earlier in the year, but I guess I overlooked them.
 Kitchen counters are a funny thing. You can either buy really cheap ones or really expensive one. There is no such thing as a quality countertop that won't break the bank.
 We decided to go ahead with installing the staircase over the winter. This comes from the same stock of ash we used for the kitchen counters. Will sawed up the raw ash boards in is workshop and laminated them into a landing for the staircase. This is actually the back of the landing, and will be hidden from view. The face-up side will have fewer darker whorls in it (although I like the whorls; it givees the hardwood character). It looks like he laminated about 8 1-inch boards before planing, sanding, and applying 4 coats of polyurethane finish.
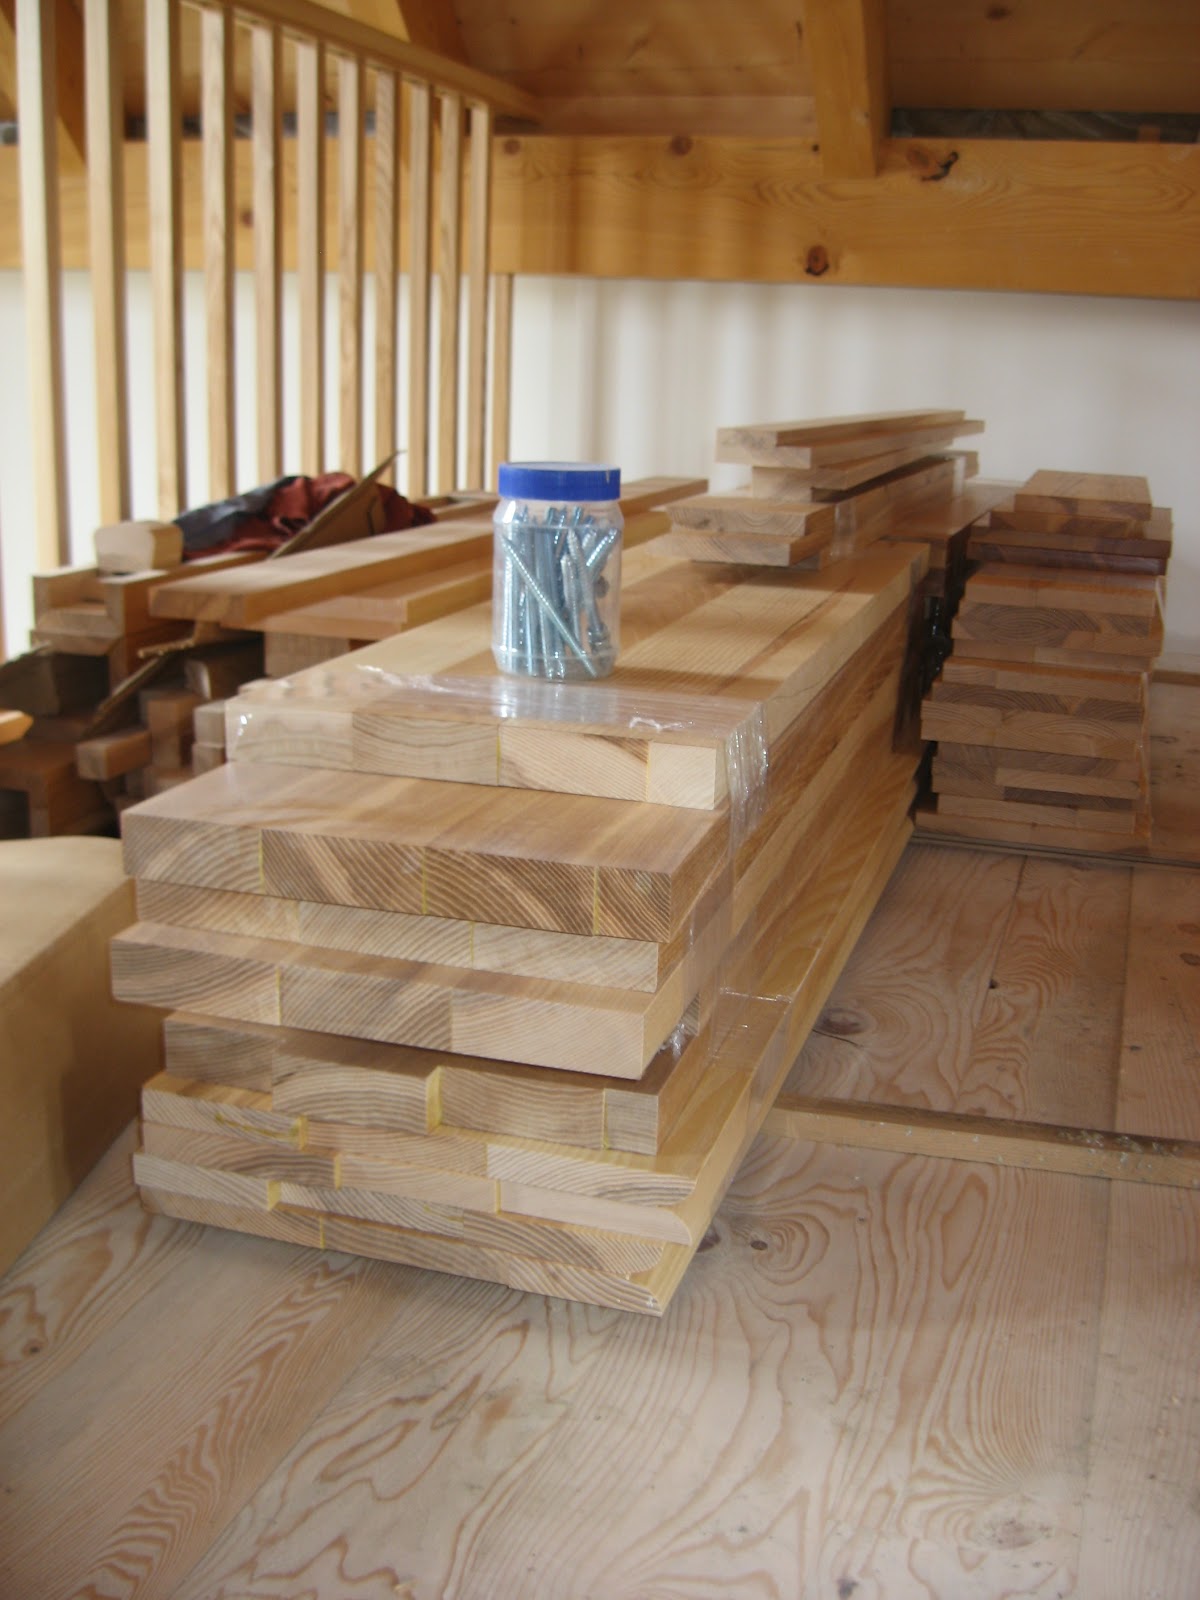
 A nice thing about timber frames over conventional houses is that the walls are made of light trusses and can be made thick. A side benefit of this is deep window sills. Lisa made an executive decision to have Willy finish the kitchen windows with the same ash as our kitchen counter tops so that we can treat it as an extension of the counter. It was kind of hard to capture this because of the glare you get off the finished wood near windows, but these pictures illustrate the effect.
 The window remains unfinished for now, but eventually (i.e. when we have money again) we'll have the ash lining the entire window. Lisa is putting on a urethane finish on all the windows to protect them from mold and condensation in the wintertime. I wish I could say it was worth the effort, but I can't because it's all Lisa's effort; we have occasionally discussed the advantages of PVC when faced with the work necessary for maintaining wood windows.
This will be the only window finished for the winter. We thought we'd leave it all until the spring, but Lisa figures she likes her time in the kitchen and that it will be all the more pleasant with a finished window supplying that extra counter space.
.
The window remains unfinished for now, but eventually (i.e. when we have money again) we'll have the ash lining the entire window. Lisa is putting on a urethane finish on all the windows to protect them from mold and condensation in the wintertime. I wish I could say it was worth the effort, but I can't because it's all Lisa's effort; we have occasionally discussed the advantages of PVC when faced with the work necessary for maintaining wood windows.
This will be the only window finished for the winter. We thought we'd leave it all until the spring, but Lisa figures she likes her time in the kitchen and that it will be all the more pleasant with a finished window supplying that extra counter space.
.
 We went with Plan A on the stairs, which was to enclose the area beneath them for closet and storage. The option was open risers, but those usually need a bigger space to look good. This was the right decision.
 Here's a picture of the completed upstairs landing. The edge trim of the floor was added this week on a rainy day. Nice job on the corners. I'm glad we have carpenters that like making it look nice.
 Here's a look at the upstairs following the drywall, mudding, and painting. It pretty much sums up all the nice work and contributions: the timber frame from Willy Lemaitre from Sutton, Alex Courvoisier (from Dunham) assembly job, the ceiling planks from Nicholas Hamel in the Beauce, the windows from Elite courtesy of the Liptak family near Ottawa, the flooring planks sawn up by Martial Marois in Granby, and finally the mudding and painting by Luc Tremblay in Frelighsburg to bring out the colours in grains in all this wood.
 The flooring is almost done upstairs. This shows the 2'' tongue and groove hemlock planks on the timber rafters. They double as the floor upstairs and the ceiling for the first floor. This wood was kiln dried in Cowansville then planed and dried in Granby. Not drying it would have meant cracks opening up between planks as the wood dried.
 Spent Friday loading up the truck and trailer for the drier. Here's the full load, which I loaded all by myself. This was way harder than doing it as a team of three. Note the posture indicating that I really wished I'd taken a water and lunch break instead of working for 4 1/2 hours straight. The planks are smaller than the hemlock, but they make for a heavy load. I had to floor the truck to get it up and over the hill on the way to Cowansville ... and, yes, we did have a little orange flag at the end of the lumber sticking outback of the trailer.
 I was desperately tired and needed help unloading the wood, and to keep me focused on the drive to Cowansville. Here's Lisa at the driers with all the wood delivered so far. She's sitting on the hemlock. The rest is all hardwood. We were both pretty zonked afterward so we had a pizzaghetti dinner at Frelighsburg for dinner.
 The lesser qualiy hardwood species (sugar maple, black cherry, white ash, and yellow birch) were transported to a hill further down the hill. These werw smaller logs or logs with more knots in them, so they have imperfections in them and tend to warp as they dry. Generally, they are used for flooring, because flooring uses smaller planks and the imperfections can be removed as you saw the wood to size. Here's a before picture. I have an after picture of the sawed wood somewhere. I'll post it later.
 Here I am helping the sawyer cut up the logs into boards. It was very dirty work, especially when things got wet and rainy. The hemlock sawdust in particular stained my T-shirts into a reddish brown tie-die. The logs are rolled manually from the stack onto a hydrolic lift on the side of the saw (shown here). The log is then hoisted onto the trailer. The sawyer then moves the blade down the length of log, slicing off first the bark, then one board at a time. I then removed the boards and stacked them. The shown log here is ash, which will go into the steps of the staircase. Ash is among the toughest of the hardwoods, and good for stairs and flooring. We may also use it for countertops, although Willy (timber framer and cabinet maker) might need to special order some to get the dimensions he needs.
 It was a grinding, hard lifting and exhausting, but the sight of stacked boards at the end of the day was worth it. The hemlock was particularly water laden and heavy as lead. The biggest boards. shown here, were a few 2''x12" board, 17 feet in length, and we nearly killed ourselves stacking it. It was also a challenge fitting them into the trailer for transport to the driers. The plan is to dry them, plane and sand them nicely, then have the sawyer cut them into tongue and groove planks that fit together snugly. They will make for nice plank flooring on the second floor of the timber frame, while the opposite side will act as a nice plank ceiling for the bedroom and mezzanine area. They will also act to solidify the structure of the frame one they are fitted together (the frame will be overbuilt by a large margin. Also shown here are some shorter planks, some 4x4 posts to hold up porch roofs, and some 1'' black cherry (the cherry, of course, is on the top).
 We cut most of the hemlock into 1 1/2'' x 6" planks of varying lengths. The lesser quality boards went into the southern porch, but most will eventually go into siding. These will be cut into triangular ship-lap boards these don't need to be dried. We still hven't decided whether to let them weather naturally (into a grey barnlike finish) or to protect the wood with varathane an retain the wooden color.
 We had trees cut for the hemlock siding, hemlock floorboards, hardwood flooring, and other hardwood cabinetry cut out from the back of the property and hauled out with horses (skidders damage the woods too much for our liking) in the winter of 2008-09. As it turn out, some of this would go into the decking as well. The wood was dragged to a clearing that was at one time supposed to be the location of another house that never materialized.
 The logs were stacked for later processing. We would saw these up into boards later in June and leave them to dry for a year in the woods.
 Used my pick-up today with a trailer from Alex to move the wood drying in the forest to Sechoirs Cowansville, where they will dry the wood to a uniform humidity. Alex was very good about lending us his trailer, and even adapted the brake cables so they could be attached to the pick-up. I was very pleased with the performance of the truck and trailer. My expression and posture here clearly indicates that this Chevy 1500 hauls ass, and that you should not mess with us.
 Drying the wood means that it can be planed sanded, and then cut (into boards for flooring, furniture, cabinetry, trim) without danger of the finished wood warping or shrinking. Lisa and I had help in loading and unloading from Don Bissonnette, who likes lending a hand with do-it-yourself projects like this. Here we are unloading planks of cherry in the yard. The Sechoir people will move it with forklifts into the huge driers shown in the background and stack it professionally.
 Here, Don and I measures and count the wood. We would like to get it all back in the end, so it helps to count it before you leave it. I believe this is the first load, which consisted of ash and cherry. The ash (whitish colour) will go into steps for staircases, whereas the black cherry (redish color) will likely go into flooring.
 The crew finished putting up the ceiling and roof trusses yesterday. It's starting to feel like a real house. We now have to wait for a nice dry day and a full crew to install the roof insulation, sheathing, and house wrap. The house site is at least protected from the next snow storm.
 This is the ceiling for the house. It is sanded, kiln dried hemlock, 3/4" x 6" x 16' tongue and groove. It is very dry. Willy wanted it that way to make sure the wood doesn't shrink. The finishing is the first thing applied to the rafters, and actually serves structurally to hold the rafters together in a single roof structure.